Wednesday, 24 January 2024

120mm quiet fan mod for MikroTik CRS312-4C+8XG Cloud Router Switch

Fan mods for the MikroTik CRS312-4C+8XG Cloud Router Switch are quite popular, generally this is just swapping out the stock 40mm fans for Noctua 40mm fans. However, these fans are quite expensive as you need 4, and my understanding is that although they are much quieter than the stock fans, they are still a bit noisy.

The simple fact is that the smaller fan, the faster it must spin to push the same amount of air as a larger fan. And the faster it must spin, the noisier it will be. So the solution to get the switch as quiet as possible is to fit fans as large as possible.

If you want to rack mount the switch with something else directly above it, then unfortunately you can't do much better than the 40mm fans. But if you have some space around the switch, you can remove the lid and fit a couple of 120mm fans to keep it cool.

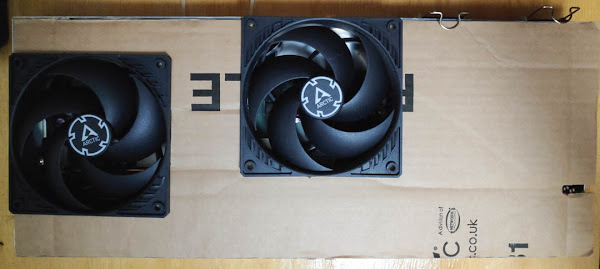
MikroTik CRS312 4C 8XG Cloud Router Switch quiet 120mm fan mod top view
top down view of MikroTik CRS312 4C 8XG Cloud Router Switch quiet 120mm fan mod

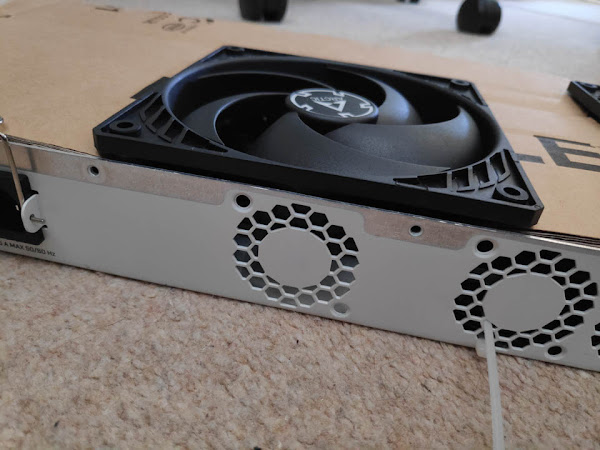
For my mod I just used a piece of corrugated cardboard as the new lid, so my mod is fully reversible. If you aren't averse to cutting the metal lid, you could possibly find some low profile fans that you could screw into the metal lid - my standard size fans have to stick out slightly above the lid of the switch.

120mm fan and back of switch

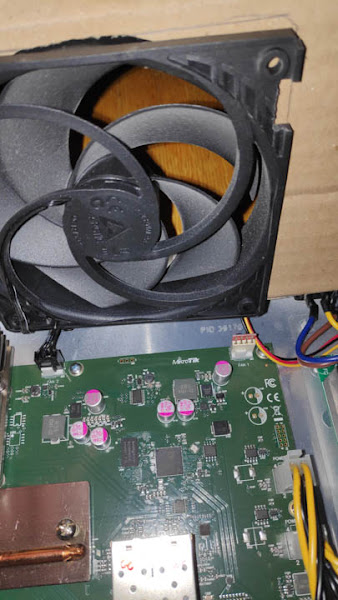
Ideally you'd also use fans in a pull orientation, to suck in air past the components and then expell the hot air. I think this should work slightly better than my configuration of push orientation, blowing cool air onto the components. It's not just a case of flipping the fan to change the orientation as you want the 'guard' piece of the fan shroud pointing down against the components so the fan can rest on them without them sticking up into the fan blades or rubbing against the hub. But reverse fans aren't that common.

looking down at switch internals through fan blades

The top / left fan has space around it, and is just kept in place by the cardboard lid.

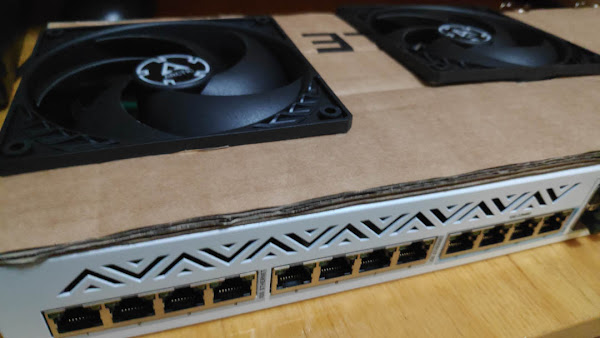
MikroTik CRS312 4C 8XG Cloud Router Switch quiet 120mm fan mod front view

The second / middle fan you can wedge between the SPF port shielding and the back of the switch. On the right you will need to remove part of the fan shround to allow it to fit down around the 4 pin power connector.

cut out at side of fan to fit round power cable socket

When inserting the fan you will also need to ensure you allow the power cables to run through the shroud rather than trapping them below or above the fan.

power cables routed over bottom lip of fan

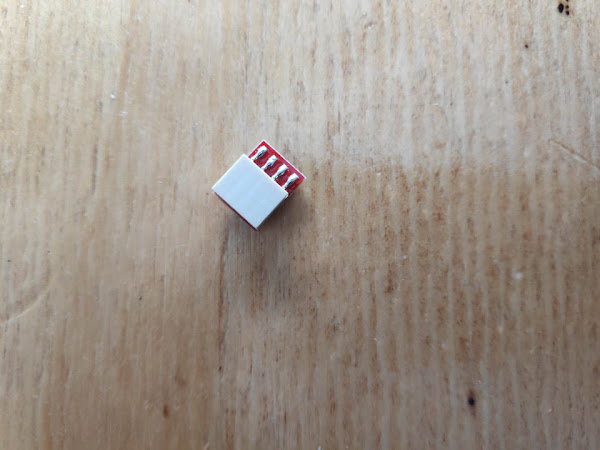
Because we're only fitting 2 fans when the switch normally has 4 fans, you'll need to unplug all four 40mm fans if you want the switch to be quiet. This will then make the switch think the two unplugged fans have died and show an error light on the front. If you find this annoying (I do), you can fit fan simulators on the two unused fan headers.

You'll need to make sure you get very low profile ones as the headers are below where the 120mm fans sit. Taller fan simulators would collide with the fan blades. I originally purchased two of the small fan simulators pictured below, but these have since both died and have now been replaced by ones that have a short flexible lead between the header plug and the simulator PCB.

small fan simulator front
small fan simulator rear
fan simulator and fan connected to switch mainboard

The fan cables I just cable tied to the holes where the previous small fans were located.

fan cables cable tied to air holes at back of switch

The 120mm fans only have to spin at a very low speed to keep the switch cool enough. (The fan simulators show a very high RPM).

Fan speed

Monday, 1 January 2024

PSP Mic not working fix

When in Japan I bought a copy of the "Talkman English for Kids!" PSP game. However, on testing it once I got home I found that while the game worked on my English PSP, the voice detection part of the game was not working. After looking into this, it turns out that the PSP does not have a built-in mic, but you need a separate accessory mic that plugs into the top of the PSP.

So I purchased the "Talkman" PSP game, which includes the USB mic in the package. The mic just plugs into the mini USB socket on top of the PSP. But on testing it, this wasn't working either. It seems that for some reason the mic draws power from the gold contacts either side of the USB connector rather than just using USB power.

The contacts on my PSP looked pretty dirty, so I thought I'd document how I cleaned them here as they are too small to clean with something like a cottonbud. I broke a cocktail stick in half, then dipped the broken end into Isopropyl alcohol. I then pushed the broken end of the cocktail stick into the hole where the contact is located. This is a pretty tight fit.

I then moved the cocktail stick back and forth and twisted it round to try and scrub the contact clean. Repeat with the other contact. If your contacts are pretty dirty like mine, you can then repeat the process with the other half of the cocktail stick until you hopefully have both contacts fairly clean.

After doing this, the mic works fine.

Saturday, 29 July 2023

Cheap Ali Express relegendable keycaps as replacement for Tipro MID keycaps

I have a Tipro POS keyboard that has relegndable keycaps, but the majority of the keycaps on it are missing the top clear plastic bit that clips onto the keycap. Unfortunately, it seems these tops are not available to purchase. You may be able to get some secondhand from a seller on deskthority.net, but the cost including shipping is likely to be near the cost of the keyboard itself.

The nearest thing I have been able to find available new is a complete key replacement that comes with its own plastic top cover. The transparent top cover is incompatible with the Tipro MID keycaps, so you would need to replace the whole key. The set I purchased from Ali Express was titled 1/10/pcs Transparent Keycaps Double-layer Keycaps Removable Paper Clips Custom MX Switch Relegendable Keycap Shell Protection. The link for them was: https://www.aliexpress.com/item/1005004623750938.html.

Although these keycaps are pretty cheap, my keyboard has 80 keys that are missing the plastic lid. So it would still cost me about £18 to replace them all, which is a good way towards the full cost of the keyboard. Plus, you have to pull every single key and replace it compared to just clipping on a plastic cover on top of the existing keys. Anyway, I just ordered one pack of white/grey and one pack of black to see what they are like.

Although the height of the unmounted keycap is similar to the Tipro MID, the centre mounting column is much longer. This means the keys sit higher than the original MID keys. The top of the new key without its plastic cover sits at around the same height as a MID key with its plastic cover. So if you just wanted to get all keys to a standard height, then that would work. But as soon as you add the plastic cover on the Ali Express keys, they are higher than the Tipro MIDs with their plastic covers.

Tipro MID keycap (left) vs Cheap AliExpress relegendable keycap (right)Tipro MID keycap (left) vs Cheap AliExpress relegendable keycap (right), both without top lid / cover

Tipro MID keycap (left) vs Cheap AliExpress relegendable keycap (right) underside viewTipro MID keycap (left) vs Cheap AliExpress relegendable keycap (right) underside view

Mounted on the keyboard you can see the Tipro MID keycaps with tops attached are about the same height as the black AliExpress Relegendable keycap without its top attached. The white / grey AliExpress relegendable keycap with the top attached you can see is much taller in profile. Below that you can see the Tipro MID keycaps without their tops.Mounted on the keyboard you can see the Tipro MID keycaps with tops attached are about the same height as the black AliExpress Relegendable keycap without its top attached. The white / grey AliExpress relegendable keycap with the top attached you can see is much taller in profile. Below that you can see the Tipro MID keycaps without their tops.

Top view, you can (just about) see the extra space around the cheap black keycap because it doesn't have its lid attached.Top view, you can (just about) see the extra space around the cheap black keycap because it doesn't have its lid attached.

The style of the keys is also slightly different. The Tipros have more of a slant at the front and are pretty straight up at the back. Whereas the new keys have a very slight slant that is the same on all 4 sides.

I would say if you had a Tipro MID keyboard where you wanted to replace all the keys, then these keycaps would be fine. But if you wanted a mix of Tipro MIDs and other keys, then these wouldn't really be suitable due to the height difference. Yes, they are the same height without the transparent tops, but then you're going to have to stick labels on them and the keys are a bit smaller in width and length without the lids clipped on.

Sunday, 24 April 2022

Startech VID2HDCON2 / QED QCV EA0053 / Koryuu Video conveters

Recently I got a couple of video adapters, so I thought I'd post my quick tests with them. One is a SCART to component converter, the other a S-Video (S-VHS) and Composite to HDMI converter. I also re-tested the Koryuu, which converts S-Video and composite to component. For my uses I'm just interested in using them to get old games consoles working with a modern TV (Philips 50PUS8204/12).

Startech VID2HDCON2

Firstly the Startech VID2HDCON2 S-Video and Composite (and sound) to HDMI converter. This has an S-Video in port, Composite video in (RCA) port, and 2 RCA ports for left and right sound in. Then an HDMI out port.

It takes 5V power, but the jack is smaller than a standard barrel jack. (Mine didn't come with a power supply so I used a USB to barrel jack power with a barrel jack adapter to step it down to the smaller size). Then there's a power switch to turn it on and off.

On the front you get a button to toggle between Composite and S-Video and some LEDs to show you which one is selected and that the device is powered.

While this converter does work okay, it makes the 4:3 ratio consoles stretch to 16:9. Changing the aspect ratio on the TV settings has no effect. So no good to me.

Koryuu

The following tests were using the Koryuu to convert S-Video to Component, then the OSCC to convert to HDMI. The Koryuu has S-Video and Composite inputs on one side, and Component out on the other.

The Koryuu works okay. Have to press input button on Koryuu for a couple of seconds so it changes from red to green light to select S-Video. The Koryuu needs to be turned on before the console(s). Suggest: OSCC on, Koryuu on, change Koryuu to S-Video, change OSCC to YPbPr, turn on console (and select correct switch on S-Video switch if using one).

For sound you need a dual female RCA to 3.5mm stereo male cable. The stereo end goes into the AV2 audio in port of the OSCC. The small switch on the OSCC between this port and the HDMI jack needs to be positioned towards the edge of the case for the jack to be used as AV2 audio in rather than AV1 (SCART) audio out. The Koryuu itself does nothing with sound.

If the TV keeps saying "Video format not supported", putting the TV in standby then turning back on should fix it.

QED QCV EA0053

The QED QCV EA0053 has SCART input on one side and Component out on the other.

When I purchased the QCV it didn't come with a power supply. I found online suggestions that it used a 7.5V DC power supply. This was just mentioned in an online forum, I couldn't find anything more official about the power supply needed. So I tried 7.5V and it does work with that. Possibly it may work with 5V, but I've only tried with 7.5V DC (positive tip). The jack size is standard barrel jack.

Like the Koryuu, I tested this with the component out going into the OSCC. The OSCC does SCART RGB in, so this converter isn't actually needed for this, but I just purchased it because it was cheap and wanted to see how well it worked.

The main issue with the converter is that it doesn't deal with audio at all. So you need to use a SCART pass-thru adapter with audio out into the converter so you can extract the audio. I didn't think the adapter we had would work for this, but it did.

Using RGB SCART into the dumb switchable SCART / RCA adapter into QED SCART to Component converter then to the OSCC makes the sound & video cut out every so often (with PAL GC as source). It does the same without the dumb adapter (but obv. no sound). SCART straight into OSCC has no issue.

Running the component out from the QED QCV straight to the component in on the TV (so bypassing the OSCC) gave no issues. The image was stretched to 16:9, but changing the aspect ratio on the TV settings fixed this. So there seems to be something about the component output from the QCV that the OSCC doesn't like.

When trying this initially, connecting straight to the TV didn't black out but I got 2 bars of weird static effect that slowly move down the screen over the picture. After trying some higher quality audio RCA cables (I don't have long enough high quality component cables, just cheap ones) then I found it actually gave a good quality image.

Using the dumb S-Video to SCART adapter with a S-Video input into the QED SCART to Component converter gives no image or a very dark grayscale image. TV also says "Video format not supported". So the QED QCV does need RGB SCART and won't work with S-Video or Composite (both of which can be transmitted over SCART).

Conclusion

If you don't have an OSCC and want a cheap way to get RGB SCART into a modern TV that supports component, then the QED QCV is a cheap way to do this.

The Startech VID2HDCON2 is not a good way to get S-Video and composite video into a modern TV, at least for stuff that uses a 4:3 aspect ratio, which will be most things you'd want to use it for. The Koryuu works well. If I didn't have the Koryuu, I would probably look at the Kaico OSSC None RGB Add On Board, which seems a bit better featured.

If I didn't have the OSCC (or even if I did but I had the spare cash), I'd look at the RetroTink 5x Pro, which does about everything you need for connecting older games consoles to a modern TV.

Saturday, 9 April 2022

Annoying facebook marketplace scammers

I've been looking on Facebook Marketplace for a couple of things I wanted recently. Yesterday I was surprised when I saw a load of listings for one the items I was looking at, all with the same photos but for sale in different locations and by different sellers. There were 3 different listings they had copied and then added multiple copies of each.


This screenshot is actually from today, and there are only a couple of obvious scam items on it

I thought this was quite a weird scam since Facebook marketplace is for face to face sales, and wondered how these scams would work. Well, today I received a reply to a message regarding a listing I had enquired about a week and a half ago. This was before I had seen any of these scam listings, and it wasn't one that had been duplicated. But the reply indicated this was a scam listing as well. Their reply was:

Yes, in our website for sale, limited promotion. If you are interested, please contact me, I can provide you our website, you can learn more about this product in detail. Our products return within 30 days, with a two-year warranty ,free shipping.

So unfortunately it now seems that finding genuine items for sale on Facebook marketplace is very difficult. With eBay listings you can usually easily if its a scam (No Buy it now, but a buy it now price listed in the description, description saying you need to contact teh seller before bidding, etc). For these Facebook marketplace items it seems you need to click on the seller's profile image, and view their other items for sale. If they have a load of other items available and all for the same price, then it indicates a fake scammer account.

I just checked the seller profile on another of the same item I'd been looking at (this one was located further from me, so I hadn't actually messaged them), and sure enough that one is a scam account as well.

Friday, 24 December 2021

Calumet MF6820 Studio Clamp (Cheap Super Clamp)

I purchased a couple of these a few weeks ago, and just got to checking them out today. They are a cheap version of the Manfrotto 035 Super Clamp. I thought I'd do a quick review / info piece on them as there doesn't seem to be much info out there.

In terms of quality, they are what you'd expect - not as good as the real Manfrotto super clamps. I don't have any cheap Chinese ones to compare, but based on my experience with smaller cheap Chinese clamps, I expect the Calumet ones would be significantly better.

The knobs / handle in particular feel a bit more flimsy / cheap compared to the Manfrotto super clamp. On one of my clamps the rubber at the end of the moving part of the jaw is a bit out of position and raised up (I have tried to push it into place, but with no luck - I think it has been glued like this.

The rubber pad on this grip is raised up at this corner

Now, the main point of this post is to cover the use of the 2 screws that they come with, and the threaded holes in the base of the clamp. As there are no instructions or documentation included with the clamp, and no mention of what these are for on the websites of retailers selling the clamp. The point of these is to allow mounting one clamp at a right-angle, attached to the other clamp. So you could have one clamped to the vertical pole of a stand, then the other holding a pole horizontally like a boom arm. Or use double this setup with two stands and the clamps holding a horizontal pole between them to act like a background stand.

The screws push down in the holes within the V of the jaw. They do need a bit of force to push down - use the hex key also included with the clamp (the screws have hex heads). You'll also need to fully open the clamp to more easily get the hex key above them to push them down and tighten them. These then screw into the two threaded holes at either side on the base of the other clamp. Then you do the same with the other clamp so they are both screwed into each other for maximum stability and strength.

The two holes in the V grip part of the clamp the screws need to be pushed down through
Two clamps, one with the two screws pushed through, ready to screw into the threaded holes in the base of the other clamp.
The two clamps mounted together at right-angles using the screws

This combination gives you the equivalent of the Manfrotto 038 Double Super Clamp. But two of the Calumet MF6820 studio clamps are £28 total, while the Manfrotto 038 Double Super Clamp is £54. So quite a saving with the Calumet clamps. However, do note that getting the screws out again from the Calumet clamp is quite a pain.

While the Calumet clamps aren't as good quality as the Manfrotto ones, there are actually some advantages of the Calumet ones:

  • They also have a 1/4" female thread in the centre of the base, so you can screw them straight on top of anything with a 1/4" thread. Or you could screw in something like a 1/4" male to 3/8" male adapter then mount something onto the base of the clamp that way (though I would assume you'd generally be better off using a stud with the thread you want).
  • You can pull the clamp handle out and then reposition it without tightening / loosening the clamp at all. Useful for repositioning the handle after tightening it down, or if you have the clamp in a position where you can't fully rotate the handle to tighten / loosen the clamp. I believe Manfrotto now makes a super clamp with a ratcheting handle as well, but my old Super clamp doesn't feature this.
  • They come with a flat wedge that fits into the V of the clamp for use when you are clamping two flat surfaces together. This neatly stores under the screw used for tightening the stud / spigot in place. However, it does restrict how much you can tighten down this handle when it is stored there. But it's nice that you get the flat wedge included even if the storage solution for it when not in use isn't perfect.

To sum up, initial impressions are that these do appear to be decent, value for money clamps. I would prefer they had better quality to match the Manfrotto super clamps, if that was possible without pushing the price up more than a couple of quid.

Saturday, 20 November 2021

Cleaning / Removing Parcel tape / Packing tape residue from cardboard box

tldr; Use a hairdryer to heat tape to allow you to remove it easily leaving minimal residue. Then rub blu-tack on any residue left to remove it.

It's really annoying when you purchase a collectible off ebay, then the seller just tapes it up and posts it off in it's original box rather than placing it inside a separate shipping box. With collectible stuff the box is an important part of the collectible, so to get it covered in large shipping labels and ugly brown parcel tape is a pain.

This recently happened to me, so I've been looking around for solutions to clean the box up and get it looking decent again. The most common suggestion I found was just about using a hairdryer to heat up the tape to allow you to remove it more easily. This did work, though with the amount of tape my package was covered in, it took a long time to get it all off. You just have to heat a section of the tape for half a minute or so, pull that bit up, heat the next few inches, pull that up, etc. until you've eventually got it all off. I also found it didn't work so well where the tape was going over a paper sticker, it was difficult to pull the tape up without ripping the sticker.

After doing this I was still left with a lot of sticky brown residue in various areas where the tape had been. The worst areas were on a couple of paper stickers where the brown residue had just stuck to the stickers and just the plastic part of the parcel tape had lifted up off them.

Most solutions for cleaning up the actual parcel / packing tape residue were to use something like 'Goo Gone'. I have ordered a bottle of this, but my experience with a similar product is that it is quite oily / greasy. While it may make it possible to clean up the tape residue I would expect it would soak into the cardboard and stickers, just giving me a different problem.

A solution I only saw once was a comment from someone suggesting blu-tack (well, actually they suggested the equivalent product from some other country). So I gave this a go, just rubbing the blu-tack on the tape residue and it worked surprisingly well.

Above is actually after cleaning some of the residue from the box, but you can see there is still some residue left on the box, and the sticker is really bad. You can also see my blob of blu-tack I used for the cleaning.

Above image shows partway through cleaning. You have to rub quite a lot with the blu-tack to get the tape residue off. Possibly if you heated the tape residue again if would come off easier? I found that it was particularly stubborn to remove from the paper sticker.

Above shows after cleaning.

Above you can see that this solution unfortunately doesn't work for all cases. While the blu-tack did remove the brown sticky tape residue, it also removed the ink from the printing on the sticker. So I decided to leave this sticker as it is. Maybe I will try some of the goo gone on it when I get that, unless anyone has any better ideas?