Saturday, 29 February 2020

Fixing sliders & USB port on M-Audio Axiom Pro 49 keyboard

Last year I purchased an M-Audio Axiom Pro 49 keyboard from eBay. Although I had several 'keyboards' already, I didn't have a 'normal' midi keyboard, which I hoped this would work as.

The keyboard was described (on eBay, where I purchased it from) as being in good condition, but with two broken sliders. However, when I received it, the case was actually quite different (as unfortunately often happens with things bought from eBay). The USB port was very loose and to get the keyboard to work with my PC I had to hold the USB cable in at a certain angle, and stick something heavy on the cable to keep it in place. Some of the keys also make quite a 'croaky' noise when pressed, but they do seem to work okay.

Opening up the keyboard wasn't too difficult, but there are a lot of screws to undo. You don't need to undo the large black screws in the middle of the keyboard's underside, just all the other screws. With the screws undone you can remove the top of the keyboard.

After that you need to remove a few screws holding down a long metal bar that goes across the top of the keyboard. Then you can unscrew the board with the sliders, undo the ribbon cable that attaches it to the main board, and remove the slider board.

I unsoldered one of the broken sliders and found it was an Alpha branded B10K 45mm (30mm travel) slider pot. However, I couldn't find the exact same model anywhere. The nearest I could find is the RA3043F-20-10EB1-B14, which looks to have a plastic rather than metal lever. This is also available on Amazon: Taiwan Alpha Electronics RA3043F-2010EB1-B10K 10k8486; 1/5W PC Mount Linear Taper Slide (Pack of 3).

Although there are plenty of cheap 45mm length (30mm travel) B10K sliders on Ali Express, they all seemed to have the contact pins on the outside of the slider, and also be missing the two inner PCB mounting pins. The Alpha sliders used on the Axiom board have their contact pins a bit further in from the ends of the slider. The only suitable ones I could find on Ali Express were ALPS branded ones, e.g. RS30 Series ALPS Switch 45mm 4.5cm Mono B10K Slide Potentiometer Speaker Mixer Faders Shank Length 10MM, you can find more at the top of this page of search results, and the end of page of the same search results (at the time of writing): 45mm B10K search results page 3.

From eBay I managed to find a set of 4 unbranded ones that look correct: B10K Slide Potentiometer 30mm travel single unit 45mm Length short shaft x4pcs. These were $15 + $2 P&P, and what I purchased. The ALPS ones from Ali Express were $4.5 + $3 P&P ea. The Alpha ones from Amazon were $10.81 + $4.17 P&P. The Alpha ones from Mouser UK were only about £1.5 each, but they didn't have any in stock, and I suspect P&P would probably add quite a bit to the cost as well. The ideal purchase would have been this ebay listing for Alpha 45mm B10K 10K Linear Taper Slide Potentiometer, as that looks to be exactly the same model as is used on the Axiom slider board. However, they only had 2 in stock (which is the number I needed, but I preferred to buy from a source where I could order more in the future should the need arise). They are also much more expensive at $7 + $3 P&P each.

Getting the main board out to look at the USB port was a right pain, it's extremely annoying that the ebay seller didn't mention the broken USB. I only paid £15 for the keyboard though, so I didn't think it was worth sending back for a refund. To get the main board out you have to remove all the various ribbon cables that go into it, and they were very tight and difficult to remove. On one a wire end popped out of the connector as well (no, I wasn't tugging on the wires to pull out the connector blocks).

With all the connectors removed (and the board unscrewed) I could check the USB connection and see that the part with the contacts actually moved quite a fair way back when you pushed it. The female USB B connector block has 4 pins centred on the bottom, so I bought a pack of 10 of these of eBay for £2. I also bought a pack of 10 new slider knobs, since I will need to replace all the slider knobs to keep them matched. So the cost of the sliders, slider caps, and USB connector is actually more than the actual keyboard cost (though less when you include the postage cost on the keyboard).

When trying to find the replacement sliders needed for the keyboard, I found a video about repairing the Axiom 61 keyboard. That said that the individual sliders weren't available, and you have to purchase a complete slider replacement board from M-Audio. They said the cost was only $20, which works out much cheaper than buying the separate sliders anyway. However, it seems you can no longer purchase this board, and the places online that have it listed (but out of stock) charge around $60 + P&P and that price would also attract 20% VAT and £10 post office fee to import into the UK if it was in stock for purchase.

After receiving the sliders and USB connectors I replaced these okay. But the keyboard required the separate power adapter to be plugged in for it to work, when it is meant to be able to take power over USB. Investigating this I found that a component had been ripped off the board behind the USB connector. And I had no idea what type of component this was.

M-Audio's support was completely useless, telling me that I needed to get a replacement main board, which are no longer available. Thankfully I managed to get some help over at electronics stack exchange, where the missing component was identified as probably a ferrite bead. So bought several different values of those (not knowing which value was needed), making this keyboard even more expensive.

When looking to purchase the ferrite beads, I was first looking at Ali Express, but they were quite expensive. I then looked on Mouser, where you could purchase them individually very cheap. But postage was very expensive. Finally I remembered RS Components, a UK based company. Some of the beads on there were only available in very large quantities, but most were available as packs of 10 - 25. While I was looking I also noticed they had the correct slider for the keyboard, and at a decent price (I think this one: Alps Alpine 1 Gang Slide Potentiometer, ±20%, 0.2W Power Rating, Linear, Through Hole ).

So after disassembling and reassembling the keyboard many times, a large amount of time spent looking for the correct parts to fit (and quite a bit of time fitting them) I now have a working keyboard. The only thing I'm still waiting for is the caps for the sliders, which I think must be lost in the post. So I might have to buy those again.

Moving my PC to another case

About a couple of weeks ago one of the drives in my RAID array failed. I managed to find a similar drive to replace it on eBay, though not the exact same model of drive. From my research, so long as the drive is the exact same size (or larger) and same speed (RPM) then it should work fine.

I posted on this blog previously (Why did I do this?! (RAID)) about how I'd fitted the drives into my case (Corsair Air 540). When the replacement drive arrived last week I noticed that the drive temperatures being reported in the RAID console were around 50°C on the drives. And when I took the 'drive cage' out of the case they were indeed pretty hot.


My 'drive cage' (top right) in the rear of the Corsair Air 540 case

Although they had a fan in front of them and two behind them (push - pull configuration) this obviously wasn't enough. I suspect it's that there's not really anywhere in this half of the case for the fans to pull air in from. The front fan is on the rear of a backplane, so most of it is covered by the backplane circuit board, and then the backplane just has a few small holes in the front drive bay doors for air to get pulled through. (I don't normally have any drives in the backplane, so it's not also dealing with having to pull the air past hot drives before it even gets to the drives in my 'drive cage').

All 3 fans cooling the drives were also quite small, around 80 - 90mm. So when I swapped out the dead drive I temporarily ran the drives outside of the case with a couple of spare 140mm fans to keep them nice and cool. This actually worked pretty well.

But it's not really a permanent solution. I managed to procure an old 5U Server case from work, this can be used in rack or tower configuration and is made by PCI Case. In terms of total volume (space) it's probably around the same size as the Air 540. But it's longer and shorter. With a bit of modding, this allows mounting drives at the front of the case with 140mm fans in a push pull configuration in front of and behind them to keep them cool.

Everything else fits in nicely, though I had to swap my Quadro and RAID card slots. While I can't remember off the top of my head, I'm pretty sure the lowest PCI-e slot is faster than the middle slot, so it's a bit annoying to have to swap the cards over. But the bottom slot is right next to the bottom of the case, so the graphics card's fan wouldn't be able to pull in air very well if positioned in the bottom slot.

There's no provision for cable management on the case, so it's a case of zip-tying everything. It took me ages to get the cables looking reasonable, it was a right mess before!

The front 4 fans and the fan on the rear of the backplane I put into a fan splitter. After now having used the machine for a bit, I want to swap a couple of the fans. The pull fan behind the hard drives (on the right) is a Noctua Industrial fan, which I thought would be good placed there because it's so powerful. However, it can be quite noisy, and since it is on the fan hub, it's on the same PWM signal as the other front fans. So I intend to swap that with the rear case fan.

The push fan in front of the hard drives (not visible in the pic above) is a Corsair 3 pin fan. So that's also a bit noisy. I had to use this fan here as the Noctua fans with their square design won't fit in the same position as they block a peg on the front panel. I intend on getting a circular Noctua fan (speed and airflow specs look to be the same as the other fans I'm using, which are NF-AF14 PWM models). Just need something else to buy from Amazon so I can meet the £20 free postage limit. I guess I could get 2 of the circular fans to give a consistent look at the front of the case but I don't care too much how it looks.

The case only has one 3.5″ bay, the rest is all 5.25″ bays. I 'borrowed' a load of adapters from work, which I think are actually meant for floppy drives, but they worked for mounting the hard drives. It gives a lot more space between each drive than they had previously in the DIY 'drive cage'. For the RAID drives I mounted one in the 3.5″ slot, then 3 in the 3 5.25″ bays above that.

In the middle of the case is my backplane, which takes up 2 5.25″ bays. Then there's another single mechanical drive (connected to the motherboard SATA) below that. In the bay below that are 2 2.5″ SATA SSDs, each screwed in just at one edge of the bay. Then the area below that is empty.

You can also see in the above pic one of the smaller fans (that was previously cooling the hard drives in my old case) resting on the rear left corner of the case. This is screwed into side panel to pull in air towards the graphics cards. There aren't actually any mounting holes for the fan, but like in the previous case you can just screw it through the ventilation holes in the panel.

The rear fan I had to drill new mounting holes for as the mounting holes are for a smaller 120mm fan. The fan the case comes with is molex powered, no PWM. The ventilation holes just about cover the area of the 140mm fan though, and since 140mm fans are what I have, it made sense to make it so I could mount a 140mm fan there.

Drilling the holes took absolutely ages. I had also put my motherboard in before I remembered about drilling the holes, so I then had to take it out again (don't really want metal shavings on the motherboard). I also had to take out my motherboard again a 2nd time later - when I had the PC all ready to boot, I was plugging everything in and noticed one of the annoying bendy pieces of metal on the IO shield above a USB port had got bent down and gone inside the USB port. Very annoying and time consuming.

The only other thing to talk about from the pic above is the mounting method for the push pull fans in front of and behind the 5.25″ bays. Currently the front fans aren't secured, but once I've got the fans sorted properly I will cable tie them in place (there's no other way of attaching them).

The fans behind the drives are cable tied onto what I believe are some more 3.5 - 5.25″ bay adapters. They are only attached to the 'top' adapter. The top adapters are then attached to the 'top' of the case with twist ties. This allows undoing them relatively easily, so you can take the adapter off (with fan attached) for access to the drives hidden behind it. I had to drill an extra hole in each of these adapters to allow cable tying the fans to them at the wanted position. Again, this took ages as the metal is relatively thick and I don't have any specialist metal drilling equipment.

The same adapters are used 'below' (in rack mount configuration) each fan. These adapters are cable tied to the case, but the fan is not cable tied to the adapters. They just give a point for the fan to rest against. The adapters provide just enough extra distance for the fan to work without hitting the hard drive power and SATA cables. The bottom adapters are also used for routing cables through.

The above is a general top-down view of the interior of the case. I decided to go for 2 PCI-e 8 pin power cables to the graphics card, not sure if it'll make any difference from having a single cable plugged into both 8 pin sockets as I had before, but it can't really be worse.

This pic shows the fans behind the 5.25″ bays and the rear of the backplane in the center. Trying to manage all those SATA cables was quite tricky. The USB from the backplane doesn't actually go anywhere at the moment - it's not long enough to reach the USB headers on the motherboard, so I need to get an extension for it.

The BBU for the RAID card I just stuck to the case using some double-sided tape.

Looking at the front of the case you might spot a problem - no I/O. I may try and get a front IO panel that fits in the 3.5″ bay slot, but I'm 95% sure there isn't enough space for that due to the hard drive that is mounted in that slot behind the cover. The case does have 2 USB2 ports on the side (top in rack mount). But no headphone jack. So I've had to get out my M-Audio M-Track 2x2M audio interface for audio (this plugs into the PC via USB). I also have 2 USB3 hubs on my desk with the wires connected back to the rear of the PC.

The case does come with 5.25″ bay covers that are slotted / slatted with holes. They would fit in front of the fans okay, but they are more plastic than they are hole. Similarly, there is a front door for the PC with strips cut across it, but again it is more plastic than hole. So I prefer to leave both off for maximum airflow. When my sister's kids come over I can put the door on and lock it so they don't stick stuff into the fans. They only watch Peppa Pig on youtube anyway, so it's not like it should be needing lots of air when they're using it.

Another annoying thing that happened when I was putting the PC together in the 'new' case is that one of the SATA connectors (plastic bit) on a hard drive broke off. I've never had that before. I superglued the connector back on, though the pins don't sit flush against it. I managed to get the cable plugged back on though.

Ideally I'd like to get the Fractal Design Define 7 XL case that was recently released and a lot of youtubers have been giving positive reviews. It's by no means the perfect case for me, but it's probably the nearest to what I'm looking for that's available. Unfortunately it's pretty expensive, and as it's only just released you can't get a used one cheaper. Hopefully at some point I'll be able to do a completely new PC build using that case, but obviously a new PC will be pretty expensive. So I'll just manage with what I've got for the time being.

Saturday, 4 January 2020

AMX, variable AC-DC adapter, and USB hubs

I have read in several places that the audio output of the Akai AMX isn't very loud, and that this can be improved if plugging it into a powered USB hub (the AMX is bus powered). I have two USB 3 hubs, both of which have a socket to plug in a power supply, but I didn't have a 5V DC power adapter that would fit either.

So I purchased a 3-24V Regulated AC-DC adapter (model JDT-2402000 / JDT-001), and a selection of plug adapters. Checking with a multimeter and no load, it seems it goes from about 3.6 - 24V. It displays the voltage on a 3 digit 7 segment display, though I found the voltage measured with the multimeter was always slightly higher than that indicated on the unit.

So I went to test the AMX with my computer to compare volume plugged into the PC, the USB hub unpowered, and the USB hub powered. However, I found that whenever I connected the AMX to a USB hub or the front USB on the PC, Serato (the software I'm using with the AMX) would just say AMX hardware connecting. This can take up to one minute. and never actually connect to the AMX. I tried 3 different USB cables.

Windows detected the AMX fine, but won't output sound via the AMX. Ableton Live will so long as you choose MMX/DX as the driver type and select AMX Wave (not DX) as the output device.

But when I plugged the power adapter into the USB hub, it showed up 4.99 on the adapter's LED, despite the adapter not even being powered on at this point. I adjusted the voltage dial up on the adapter, until I got to 5.02V, anything below this it still showed 4.99V.

With the power in or out there was no difference, the sound output from the AMX was exactly the same volume. This was with a Sumvision USB 3.0 Hub. With my other USB hub, an ipTIME UH305, the voltage with the power adapter off showed as 3.90. But with the power adapter off or at 5V, the volume seemed to be exactly the same.

So I'm not sure where this thing comes from about plugging the AMX into a powered USB hub for higher volume output. With my setup the AMX doesn't even work at all with Serato when plugged into a USB 3 hub, whether the hub is powered or not. And when using the AMX with Ableton, having the USB hub powered or not made no difference.

Maybe it depends on your hardware? Or what else you have plugged into the AMX (I didn't have anything plugged into the audio inputs).

Anyway, although the JDT-2402000 / JDT-001 power adapter isn't useful for what I bought it for, it still seems like a handy piece of kit to have around, especially with all the extra plug adapters I bought to accompany it. The only thing I don't have is an adapter to change it from positive tip to negative tip. However, I should be able to DIY one of these by cutting up a 5-way guitar pedal power adapter cable - just cut each end off, then reconnect them with the wires swapped over.

It would also be better if it did more than 2A (so you could use it power a laptop), but you can't have everything.


The power adapter, variety of tips, and AMX

Sunday, 17 November 2019

Noise / whine on Denon SC3900 audio out

Today I was trying to sort out how I can get audio from both Serato DJ and Ableton together. While trying to sort this out, I found I was getting an annoying high pitched noise when no sound was being made. After trying various different cables and connecting things in different orders etc. I narrowed the problem down to the Denon SC3900 I had connected up, and specifically the USB port it was plugged into. By unplugging it from the USB3 hub I had it plugged into, and instead plugging it into a front USB3 port, the noise went away.

So, similarly to the issue I had with my Multimix 16 crackling via ASIO4ALL, the culprit was the USB port. The difference here is that the USB wasn't being used for audio at all, only MIDI signals, and being plugged into a hub was the culprit rather than the fix.

Actually, after further investigation I think the issue could be due to my Roli Lightpad block, which was plugged into the same USB hub. Depending on how I have things connected I can still get some noise (though much less than before), and it is fixed unplugging the USB for either the SC3900 or the Lightpad block.

In terms of combining the audio of Serato and Ableton, the difficulty is that Serato doesn't allow choosing your audio routing, it will always send the audio to your Serato hardware (in my case my AMX mixer). It seems there are 3 different options to work round this:

  1. Send the audio from Ableton to your Serato hardware. This worked okay but the sound quality seemed to get a bit messed when doing multiple quick hits on the Kick 606 in Ableton. I tried MME/Direct X and ASIO4ALL and straight ASIO.
  2. Send the audio from your Serato hardware back to your PC then use this for an audio input in Ableton. There doesn't seem to be any audio distortion issues like this. This requires using an actual cable (at least with the AMX, when I try the combined DX option in Ableton it just plays the control tone, not the Serato output, and the combined WAV option just said it couldn't connect).
  3. Plug the output from the Serato device and the output from your PC into another mixer. I don't have another mixer, and even if I did, then plugging a mixer into a mixer just seems silly. If I was only using one deck with Serato, I could connect the PC output to the 2nd input on the AMX, and then set it to thru on Serato.

Saturday, 2 November 2019

Why did I do this?! (RAID)

A few weeks back Amazon had a good deal on some WD 10Tb USB drives. Since I was going on holiday shortly and probably going to come back with a large amount of photos and video, I thought it would make sense to increase my storage.

Presently I have a 5TB drive and then 2 5TB drives for backup. So by purchasing another 5TB drive to give me 4 5TB drives (of the same model) I could set them up as a fast 10TB RAID 10 disk. And then get a couple of the 10TB drives for backup.

In hindsight, it wasn't needed (I didn't take many photos on holiday), and just buying a normal drive rather than going RAID would have been so much easier and quicker.

The first issue was that since I was needing to wipe the 5TB drives, I had to copy the data from the 'main' disk to both the new backup disks. Then do binary comparisons of the new 10TB backups against the old 5TB backups, to ensure the data had copied okay and avoid any bit-rot issues.

After about a week, I'd got that job done. Now it came to actually installing the 5TB disks in my PC. Unfortunately my PC only has mounting points for 2 3.5″ drives (who uses mechanical drives in their PC nowadays?). I scavenged some parts from work in an attempt to find some way of getting the setup I wanted.

My case is a Corsair Air 540. It has two sides - one for the PSU, 5″ drive bay and SATA SSDs, and the other side for the motherboard, cooling, and 2 3.5″ drives. In the smaller side there are two spots the drives could be placed: above the SSDs (behind the 5″ drive bays); or below the 5″ drive bay.

The problem with placing the drives below the 5″ bay is that there is no airflow in this location and no way to add any. Basically the drives would be surrounded by the 5″ bay (occupied with a backplane) on one side, the solid case front on another, the solid bottom of the case on another, and the PSU (where the cables are attached) on the other.

The other option I did think of was having the drives just in a backplane outside of the case (acting like a DAS). There are holes in the case below where the 3.5″ drives mount, so feeding SATA and power cables out of the case to a backplane just outside wouldn't be too difficult. But this option wasn't good for me as I don't really have space near the PC for this. It's a bit annoying as well having a large case and then having to mount stuff outside of it.

I did also think of using a server tower case. This would accommodate the hardware much better than the Air 540. But airflow would be much worse - front intake would just be the backplane fans pulling in what they can through the backplanes (i.e. not much), and the rear fan is a single 3 pin 120mm. I'd rather stick with the 140mm Noctuas on my Air 540.

I'm also hoping to move to water cooling at some point, which I think will work much better with the Air 540 than a server case that has nowhere to mount radiators. I may actually move to an open air case when I do that though.

So, the only place I could see to 'mount' the drives was above the SSDs. Unfortunately a backplane is too large to mount in this area. Some of the parts I salvaged were 2 parts that take 2 3.5″ drives each. They only just fit in the area. They didn't mount together, so I cabled tied them together and used cotton buds down the 'tube' bits (where the metal edge is bent back on itself) to keep them joined together.

When actually mounting the drives in these, I found that the drives don't mount in the same place - the 'higher' drive mounts further back. This was no good as I didn't have the room for that. So I ended up securing the bottom drive in each bay with a single screw (I forgot to scavenge screws), and then taping everything together to keep the upper drive in each bay in place.

This then only just squeezes in the area when SATA cables and power cables are attached. Airflow is provided by the fan on the rear of the backplane on one side of the drives, and a 90mm fan attached to the rear of the case on the other. I need to get another 90mm fan to cool the bottom 2 drives.

Note the 10TB drive in the above picture wasn't plugged in, it was just to prop up the drive bays and keep them in place - in actual use I use the case in 'desktop' orientation, so they are resting against the side (bottom) of the case). Also, this photo was from when I had them plugged into the motherboard SATA, not the RAID card.

After getting the placement of the drives in case sorted, I booted up the PC only to find Windows wouldn't start. I spent ages trying to fix this (it would boot into safe mode no problems but not normal windows). In the end I just went for the 'Reset' (Reinstall Windows and leave personal files) option. I have tons of software on the PC I'd need to reinstall, so that's why I spent a long time trying other options before I finally gave up and went for this option.

I left it reinstalling windows while I had lunch, and when I came to check on it, it was just stuck on a black screen. Doing a forced off / on, it said it was undoing changes, then after a bit came up with a message saying the install failed and to try again. Clicking OK on this, the machine rebooted and did the undoing changes thing. Then rebooted and did the same again. Then rebooted again, and Windows loaded, with everything as it was (or near enough) before it decided to break.

So the option that said it would wipe Windows and all installed software actually didn't do this at all, but it did fix it. That's Microsoft logic for you.

Once I'd undone some of the stuff I'd done in trying to fix Windows (disabling all non-essential services etc.) I tried setting up a storage space with the 4 drives. At first one of the drives was missing, I checked all the SATA connections and it seemed one was a bit loose. On reboot they all showed in BIOS, and upon boot to Windows, Storage Spaces could now see them as well. But when I tried to create the storage space I got the error Can't create the pool. Check drive connections - Request not supported 0x00000032.

Searching for this error, I found the fix was simply to uninstall the drives from device manager, then scan for new hardware so they all get added again. Another case of Microsoft logic.

There didn't seem to be any options about number of columns, just the option to create with no mirrors, a single mirror, two mirrors, or parity. So I just chose the single mirror option - I presume this is equivalent to RAID 10 as it ended up with a 10Tb partition. I then ran Crystal DiskMark to get an idea of the speed.

I then destroyed the space and pool and ran Crystal DiskMark on a single drive.

The next stage was to set up the disks with hardware RAID 10 and benchmark that. I got everything connected, but on boot it would say 'F/W Initializing devices', get to 100%, then boot Windows. So how was I meant to get into the RAID card BIOS to set up the disks?

The card I'm using is an LSI 9267-8i MegaRAID card. Googling, I found it was Ctrl + H to get into the card BIOS. But multiple boot runs trying this, I couldn't get anything. I tried a PS2 keyboard in case it didn't like my wireless USB keyboard on a USB 3 port, still the same. Then I found another key combo - Ctrl + P to pause. Pressing this when it was saying 'F/W Initializing devices' it would then pause for about 5s after that got to 100% and would display 'Press Ctrl + H for BIOS'. But pressing Ctrl + H would just boot to Windows.

After more googling and messing with BIOS settings, I found you need to set CSM to BIOS and UEFI, and Interrupt 19 Capture must be turned on. Save the BIOS settings and reboot, press Ctrl + P when it gets to the LSI 'F/W Initializing devices' screen. Press Ctrl +h when prompted, then hammer the F8 key or whichever the boot menu key is for your system. Now choose the RAID card from the boot menu. Now you should finally be able to get into the LSI MegaRAID WebBIOS to set up your array.

However, I then had trouble setting up the RAID array. I found a youtube video that went through the process, and the bit I was missing was that when you create the 2nd drive pool, you must click the button to accept the pool. The button seems like it acts as 'add new pool', but it really is an 'accept pool' button, and if you don't accept the 2nd pool, then on the next step you only have the first pool to choose from and so can't set up the array properly.

When I was creating the array, I got the message that it would use write through as the BBU wasn't available or wasn't charged or was relearning. So I need still need to check on that. It does see the BBU and says it is operational.

These are the test results I got from Crystal Diskmark:

Single drive

-----------------------------------------------------------------------
CrystalDiskMark 6.0.2 x64 (C) 2007-2018 hiyohiyo
                          Crystal Dew World : https://crystalmark.info/
-----------------------------------------------------------------------
* MB/s = 1,000,000 bytes/s [SATA/600 = 600,000,000 bytes/s]
* KB = 1000 bytes, KiB = 1024 bytes

   Sequential Read (Q= 32,T= 1) :   215.092 MB/s
  Sequential Write (Q= 32,T= 1) :   215.584 MB/s
  Random Read 4KiB (Q=  8,T= 8) :     1.735 MB/s [    423.6 IOPS]
 Random Write 4KiB (Q=  8,T= 8) :     1.957 MB/s [    477.8 IOPS]
  Random Read 4KiB (Q= 32,T= 1) :     1.777 MB/s [    433.8 IOPS]
 Random Write 4KiB (Q= 32,T= 1) :     1.953 MB/s [    476.8 IOPS]
  Random Read 4KiB (Q=  1,T= 1) :     0.796 MB/s [    194.3 IOPS]
 Random Write 4KiB (Q=  1,T= 1) :     2.077 MB/s [    507.1 IOPS]

  Test : 1024 MiB [G: 0.0% (0.2/4657.5 GiB)] (x5)  [Interval=5 sec]
  Date : 2019/11/02 13:55:07
    OS : Windows 10 Professional [10.0 Build 18362] (x64)

Storage Spaces

-----------------------------------------------------------------------
CrystalDiskMark 6.0.2 x64 (C) 2007-2018 hiyohiyo
                          Crystal Dew World : https://crystalmark.info/
-----------------------------------------------------------------------
* MB/s = 1,000,000 bytes/s [SATA/600 = 600,000,000 bytes/s]
* KB = 1000 bytes, KiB = 1024 bytes

   Sequential Read (Q= 32,T= 1) :   209.958 MB/s
  Sequential Write (Q= 32,T= 1) :   209.387 MB/s
  Random Read 4KiB (Q=  8,T= 8) :     6.867 MB/s [   1676.5 IOPS]
 Random Write 4KiB (Q=  8,T= 8) :     2.684 MB/s [    655.3 IOPS]
  Random Read 4KiB (Q= 32,T= 1) :     6.979 MB/s [   1703.9 IOPS]
 Random Write 4KiB (Q= 32,T= 1) :     2.676 MB/s [    653.3 IOPS]
  Random Read 4KiB (Q=  1,T= 1) :     1.118 MB/s [    272.9 IOPS]
 Random Write 4KiB (Q=  1,T= 1) :     2.690 MB/s [    656.7 IOPS]

  Test : 1024 MiB [G: 0.0% (0.4/9297.9 GiB)] (x5)  [Interval=5 sec]
  Date : 2019/11/02 13:46:54
    OS : Windows 10 Professional [10.0 Build 18362] (x64)

RAID 10 on LSI MegaRAID controller

-----------------------------------------------------------------------
CrystalDiskMark 6.0.2 x64 (C) 2007-2018 hiyohiyo
                          Crystal Dew World : https://crystalmark.info/
-----------------------------------------------------------------------
* MB/s = 1,000,000 bytes/s [SATA/600 = 600,000,000 bytes/s]
* KB = 1000 bytes, KiB = 1024 bytes

   Sequential Read (Q= 32,T= 1) :   553.287 MB/s
  Sequential Write (Q= 32,T= 1) :   416.736 MB/s
  Random Read 4KiB (Q=  8,T= 8) :    12.968 MB/s [   3166.0 IOPS]
 Random Write 4KiB (Q=  8,T= 8) :     3.112 MB/s [    759.8 IOPS]
  Random Read 4KiB (Q= 32,T= 1) :    12.566 MB/s [   3067.9 IOPS]
 Random Write 4KiB (Q= 32,T= 1) :     2.724 MB/s [    665.0 IOPS]
  Random Read 4KiB (Q=  1,T= 1) :     2.601 MB/s [    635.0 IOPS]
 Random Write 4KiB (Q=  1,T= 1) :     0.530 MB/s [    129.4 IOPS]

  Test : 1024 MiB [G: 0.0% (0.4/9314.0 GiB)] (x5)  [Interval=5 sec]
  Date : 2019/11/02 15:26:59
    OS : Windows 10 Professional [10.0 Build 18362] (x64)

Sequential read speed with RAID 10 is very good, similar to SATA SSD speed. Storage Spaces is better than a single drive for random reads and writes, but generally not as good as RAID 10. Random write Q1,T1 on RAID 10 is pretty slow though, I don't know why that would be?

Saturday, 5 October 2019

Flight cases for DJ controllers comparison

I though I'd put up a quick comparison of some cases I purchased for my DJ controllers. My main interest was in trying to find something reasonably priced that would fit the Denon SC2900 & SC3900 CDJs. I wanted to be able to use the controller from within the case if possible. And ideally also allow inserting CDs into the unit while it is being used in the case, though this is more of a nice to have as they are mainly used as Serato controllers.

You can purchase flight cases designed for the SC2900 / SC3900, but they are very expensive when you consider the units' current values. So I really wanted something that would 'do the job' for a reasonable amount rather than something that was 'just right' for a lot of money.

I also have a Numark V7, around the same size as the SC3900 / SC2900, but not as tall, and as this is a straight USB controller, no need for any low access to the unit for inserting CDs into it.

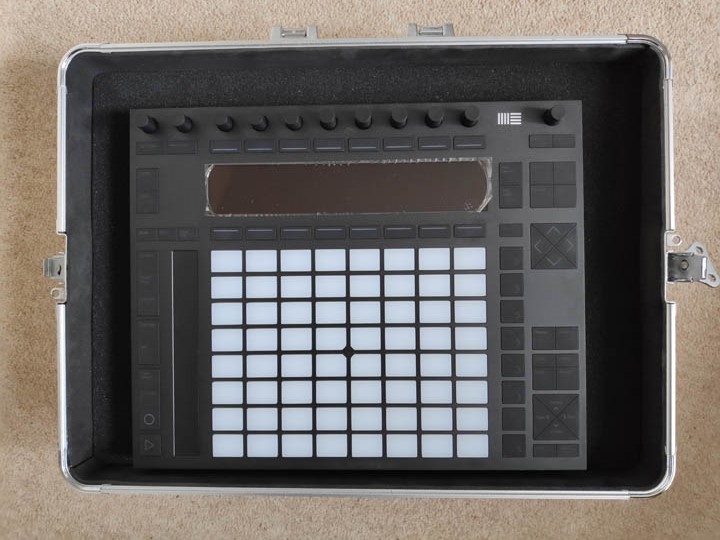
And then also the Akai APC40 Mark 1 controller and the Ableton Push 2. Again, a case that these can be used in would be best, rather than a case that is only for transport.

Pictured, from top to bottom:

  1. ROC cases (Allendale) Aluminium Flight Case with dividers
  2. Gorilla Small DJ Controller pick & fit case
  3. Gorilla 47cm wide universal pickfoam DJ flight case with door (upside down - the rubber feet above it belong to this case)
  4. Gorilla 50cm Universal Mixer CDJ Pickfoam DJ Case with Door

In the comparison below, I've put the case measurements in the order Width x Height x Depth. The measurements are from the item listings online - I haven't measured them myself.

Gorilla 47cm wide universal pickfoam DJ flight case with door ~£35

SKU:
GC-UNI-47
External:
512 x 382 x 146mm
Removable Foam:
480 x 350 x 90mm

It fits SC3900 / SC2900 but if you wanted to use the controller while in the case then you won't be able to put CDs in.

If you use the case upside down, with the controller in the lid, then you can use CDs. Note that this way doesn't give much padding to the top of the CDJ when it is packed - the spindle and buttons on top of the raised part are up against the 'lid', and there isn't room for more foam.

It also fits the APC40.

If you add one of the layers of pickfoam under the APC40 then the removable side panel is at the right level to allow connecting cables to the rear of the APC40. The downside is that I don't think using the unit like this would be a great experience as you have to reach down in the case to access the faders. Again, you could reverse the case and put the controller in the lid instead.

The V7 fits in the case fine.

It has rubber feet on the bottom, which make the case larger and are a bit annoying if you plan on using the case upside down.

You can also fit in this case the Ableton Push 2, a layer of foam, then the APC40. So you could carry them both in the same case, then when you want to use them, put the APC40 in or on the lid and the Push 2 on the foam in the base or use it on top of the base.

Gorilla Small DJ Controller pick & fit case ~£35

SKU:
GC-SDJC
External:
500 x 390 x 165mm
Internal:
480 x 350 x 80mm
Removable Foam:
420 x 305 x 60mm

APC40 fits well, and there is enough space at the sides to include the power adapter, USB cable etc. Placing the controller on the bottom of the case there isn't really enough room to plug in the cables - you would need to use right-angle adapters.

With the case upside down, and the controller placed on the egg-crate foam in the lid, then you can plug in cables normally. A layer of the included foam can be placed in the bottom (now top) of the case to provide a good amount of protection when the unit is being transported.

The SC3900 and SC2900 fit in the case, though you would need to remove the egg-crate foam from the lid to close it. But you couldn't use them with CDs while still in the half case.

The V7 fits in the case and it will close fine.

Ableton Push 2 fits fine, you can use a layer of the included foam underneath it. There is enough room in the case for including the power adapter, USB cable etc. as well. I think I suggested this case previously for use with the Push 2, but now that I have it, I must admit that it is quite a large case (height-wise) for this controller.

ROC cases (Allendale) Aluminium Flight Case with dividers ~£20

SKU:
EN-AC-FG-A022
External:
460 x 330 x 150mm
Internal:
435 x 310 x 95 (base) + 40mm (lid)

This case is actually designed for carrying tools, but you can remove the tool carrying insert from the lid and just not use the dividers it comes with.

It fits SC3900 / SC2900 and the V7, but the issue with this case is that the lid is not removable. So not really suitable for using the controllers in, but okay as a carry case.

The Akai APC40 mark 1 will kind of fit, it goes in at a bit of an angle and can't be pushed down all the way to the base of the case as it is too big.

If you wanted to put the Ableton Push 2 in this case, it would fit. But it's not really a suitable case for this controller.

Build quality isn't as good as the Gorilla cases, and it uses much cheaper feeling standard latches than the nice butterfly latches on the Gorilla cases. It also doesn't come with any foam. But it's a lot cheaper, so what do you expect?

Gorilla 50cm Universal Mixer CDJ Pickfoam DJ Case with Door ~£45

SKU:
GC-UNI-50
External:
542 x 492 x 191mm
Removable Foam:
510 x 430 x 120mm

This case actually says it fits the SC2900 and SC3900 in its description! And indeed it does, and the removable door allows you to use the CDJ in the case with CDs, without having to do silly stuff like using the case upside down. But the problem is that this case is massive.

This case also has rubber feet, making it even larger.

So my current thinking, which comes only from seeing how these devices fit in the cases, not through any actual experience in use, is to have 2x upside down GC-UNI-47 for the Denon SC3900 and SC2900. Then a GC-SDJC for the Numark V7. And another GC-SDJC, probably upside down, for either the Akai APC40 or the Ableton Push.

Sunday, 8 September 2019

Recovering a corrupted wave file

I was trying to edit a wave file today, but in Audacity it was just silence. In VLC and other audio players when you pressed play it would just stop immediately, as if the file had no length. The file was about 1GB in size, and when opened in a hex editor it certainly looked like it was full of data (i.e. not just NUL bytes).

In researching how to open / recover the file, I found this very helpful video: Fix a Corrupt Wav Audio File in Audacity - Data Recovery Using VLC. The guide there says that in Audacity you need to go to File > Import > RAW. Then to find the settings needed, check the file's properties in VLC.

Unfortunately for me, VLC didn't give any information about the file's properties / codec. I have other WAV files recorded using the same setup, so I loaded one of those into VLC, but it still didn't give any information. Thankfully using foobar (and a previously recorded working file), I did manage to get the required information. (Though it didn't give me the endianess, but there's only 4 different options to try for that anyway).

Whereas in their video an offset of 100 bytes gave them the desired result, I still got static with that offset. But with an offset of 80 bytes, the file imported okay. Initially I thought it hadn't worked, and had just opened the file as silence, but once I Ctrl + F'd to view the full file, I could see it had imported okay, it was just the first minute or so of the file was silence.