After finishing repairing my Akai APC40 mk. 1 yesterday, I was looking for a suitable case for it. whybuynew.co.uk sell a range of 'Gorilla' branded flight cases that are suitable for DJ equipment, at quite competitive prices compared to most other DJ flight cases I've seen.
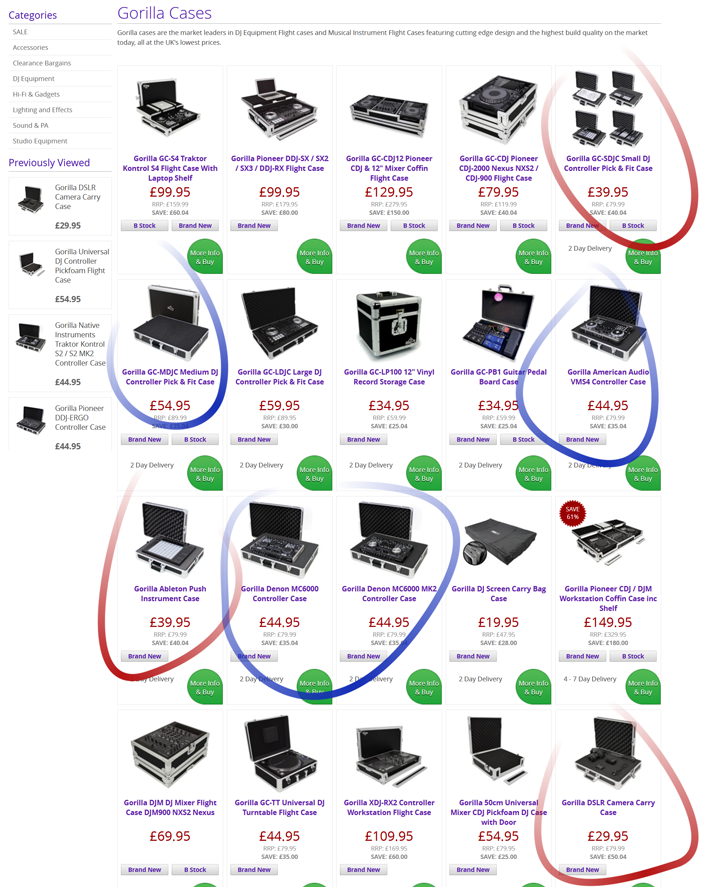
They sell generic cases, and then they also list the same generic cases as separate items for popular equipment that the cases fit. But the pricing between these doesn't always match up, despite being exactly the same case. If you look at the screenshot below, I've circled one design of case in red and another in blue.
As you can see, the 'Small DJ controller' case and 'Ableton Push' case are both the same, and the same price at £40. But for £10 less you can pick up the same case, only sold as a 'DSLR camera' case. Similarly, you can pick up a 'Medium DJ controller' case for £55, but if you instead go for the same thing but sold as being for a specific controller model, you can save £10 and get it for £45 instead.
Personally, I'm not going to but any case at the moment (there are two I want, and both are just sold as generic ones), but am hoping eBay will do a 10-20% discount off everything again at some point, then will purchase the cases via whybuynew's eBay store.
I purchased an Akai APC40 Mk I from eBay that had several broken faders. In hindsight, given the amount of time it took me to repair it, I would have been much better off to just pay the extra money for a fully working one. However, this is mainly because I'm not experienced at soldering / solder removal. I guess at least it gave me some useful experience with this, and it is more environmentally friendly to get it back to working order than just have it thrown away.
I spent quite a while trying to find the replacement faders for the APC40 at a reasonable price. The easy solution is via MPCStuff.com, where you can just select a replacement fader for the APC40 mark 1, i.e. be sure you are getting the right item.
The set of 5 cheap B10KX2 slide pots arrived within a couple of weeks. As I mentioned earlier, removing the old faders was very difficult, at least initially. To go through the full process (as per the video above):
Remove all knob caps, nuts, and washers from the top of the APC40. Also remove the fader knobs.
Remove all screws from the bottom, including the ones under the rubber feet.
Remove the removable fader
Remove the back of the unit, being careful with the cables attached to the main circuit board
Remove all screws from the main circuit board.
Take the main board out, disconnect the ribbon cable and the other connector from the board on the bottom of the unit if you haven't already.
Use a solder wick and soldering iron to remove the solder from all the pins of the fader you need to replace. This is where I had a lot of trouble - I think the first solder wick I tried wasn't pre-treated with flux. I also found it easier after switching to a different soldering iron with a pointed tip instead of the wider chisel tip I was using to start with. You need to place the solder wick over the fader pin / leg, then hold the iron tip against the wick, pushing down onto / against the solder. The wick should then soak up the solder when it melts. It took several passes of each pin to soak up all the solder. Once the solder was removed from all the fader's pins it also required quite a bit of tugging and twisting the fader with some pliers to remove it.
Once the old fader is removed there might still be some solder left in the holes you'll need to soak up to make it easier to insert the legs of the new fader.
Insert the new fader. Temporarily hook back up the cables to the main board, connect the power and USB and check your new fader is working.
(Optional) Solder the new fader in place. I found the faders worked fine and held fast without being soldered. And given how much work it was to unsolder the old faders, I just left them unsoldered - it will make them easier to replace again in the future if necessary.
Screw everything back together, put all the washers, nuts, knobs, and caps back on.
For testing the faders, I used MIDIOX - this lets you see the midi signals sent as you move / press midi controls. I found that I was getting constant signals on channel 8's fader even when it wasn't being moved. I had already used my 5 cheap faders in replacing the broken faders (on ch 1-5) at this point, and the ALPS branded fader hadn't arrived. So I just removed the channel 8 fader and left it empty. In testing in Ableton Live I then found that the faders all worked okay, except that the channel 7 fader was also adjusting channel 8's volume.
I messaged Akai Support about this - I wasn't sure if the problem was a dodgy fader on channel 7, the fact that the channel 8 fader was missing, or a problem elsewhere on the board in how the signals from the channel 7 fader were being interpreted. I haven't had a reply from them yet, but thankfully the other fader arrived today. So I fitted that, and it seems to have fixed the issue.
I did find that the first part of the fader movement (at either end, but particularly at the bottom) has no effect. The movement also seems rather jumpy at the bottom end. But this is the same for the original faders.
This pic shows the board with the new faders fitted - channels 1-5 are the cheap ones, 6-7 are originals, 8 is the ALPS one, and the last one (master) is an original.
This next pic shows some of the replacements from the underside - you can see I only soldered one in, and you might also notice the board is a bit messed up around this one - it was the first one I did and took me absolutely ages.
This last pic shows the original channel 8 fader I removed (this one was the one sending out constant signals, all the others I removed had the control 'stick' broken off).
Hopefully this helps if you are wanting to replace damaged faders on your mark one APC40.